Steam-Deck-Hardware
Input Modifications
Joysticks
- LCD Steam Decks have 2 different versions (revision) because capacitive touch was changed in some way(?)
- To know which one you have go to Settings -> System and check the Steam Deck Controller ID
- MEDA - Type A
- MHDA - Type B
- Make sure to buy the correct replacements if necessary (3rd party joysticks might have a switch on them to work as any type)
- To know which one you have go to Settings -> System and check the Steam Deck Controller ID
- Make sure to calibrate after modification (replacing the modules or adding silicone ring etc…) - iFixit Steam Deck Joystick Calibration Guide
Hall Effect Joysticks
- Gulikit
- LCD version
- This has 2 versions
- The 1st version didn’t have the cap included and required soldering on the old one from the stock stick
- The 2nd version has the cap included, no soldering is required
- This has 2 versions
- OLED version
- Both have issues with outer deadzone being square
- LCD version
- ElecGear (Only For LCD)
- Might have issues with deadzones?
- Calibration issues when pressing joysticks in a certain way? (Read reviews)
- More information about the two / comparison
- HandheldDIY (Only For OLED)
- Tight (Increased rotational resistance)
- Standard
- Joystick caps have matte surface
- Calibration on the joystick modules
- Quality Control not the greatest(?) (Read reviews)
Custom Made Hall Effect / TMR Joystick (More info needed)
- Might be better solution compared to current hall effect offerings from Gulikit / Elecgear
Joystick Cap Swap
- Not Tested Yet - Basically OLED Joystick Caps Soldered To LCD Joystick Modules To Provide Better Grip And Look Better
- Buy OLED / LCD Hall Effect Sticks Depending On Witch One You Want (eg. Gulikit, sadly joystick caps only aren’t available anywhere)
- Desolder joystick caps from hall effect sticks
- Desolder joystick caps from original sticks
- Solder joystick caps from the hall effect stick to the original ones
- Test if everything works correctly
How To Add Capacitive Touch to Non-Steam Deck Joysticks
Capacitive touch is one wire connected to a copper plate.
That circular plate is glued on the top of the cap.
With a bit of patience you can remove it from original joystick cap and install it on any cap you want (that fits the Steam Deck, of course).
u/dvijetrecine
Yes but how do you make it not look janky?
u/NKkrisz
Only part that could look jank is the top of the stick.
The way I’d do it is get a big hole punch and rotate it till it cuts the middle part of the cap.
Then use the scalpel knife to go underneath and remove the top layer.
Dremel would be handy to smooth the bottom of the newly made hole.
Making a copper pad and soldering a wire is the next step.
After you make a hole for the wire to go through the thumb cap, use thin double sided tape to hold it in place.
Next step would be a bit more double sided tape and a circular plastic cover that would go over the copper pad.
Valve used double sided tape and plastic cover so I don’t see the reason we can’t do the same.
To keep the wire from moving around on the bottom side, it can be glued to the underside of thumb cap.
You can go the same - route as Valve and make a small channel for the cable.
I’d use soldering iron with a very small tip and about 200 °C to not melt it too fast.
u/dvijetrecine
Original Comments On Reddit (It’s slighly edited on this page)
Joystick grips
Silicone Joystick Protector Rings
- Benefits:
- Multiple colors available for extra customization
- Sticks don’t make noise hitting the shell
- Stem won’t have wear marks
- Smooth movement remains
- Playvital
Xbox Elite 2 Joystick Module And Cap Swap
- Tutorial
- Reddit Post
- Negatives:
- Requires:
- Desoldering stock joystick module
- Spacers with different screws
- Modifications to the back shell (Cutting)
- Loses of capacitive touch
- Requires:
- Benefits:
- Easily swappeable joystick caps
- Adjustable tension for the joysticks
Buttons
Clicky Buttons
- ExtremeRate Clicky Buttons (LCD & OLED)
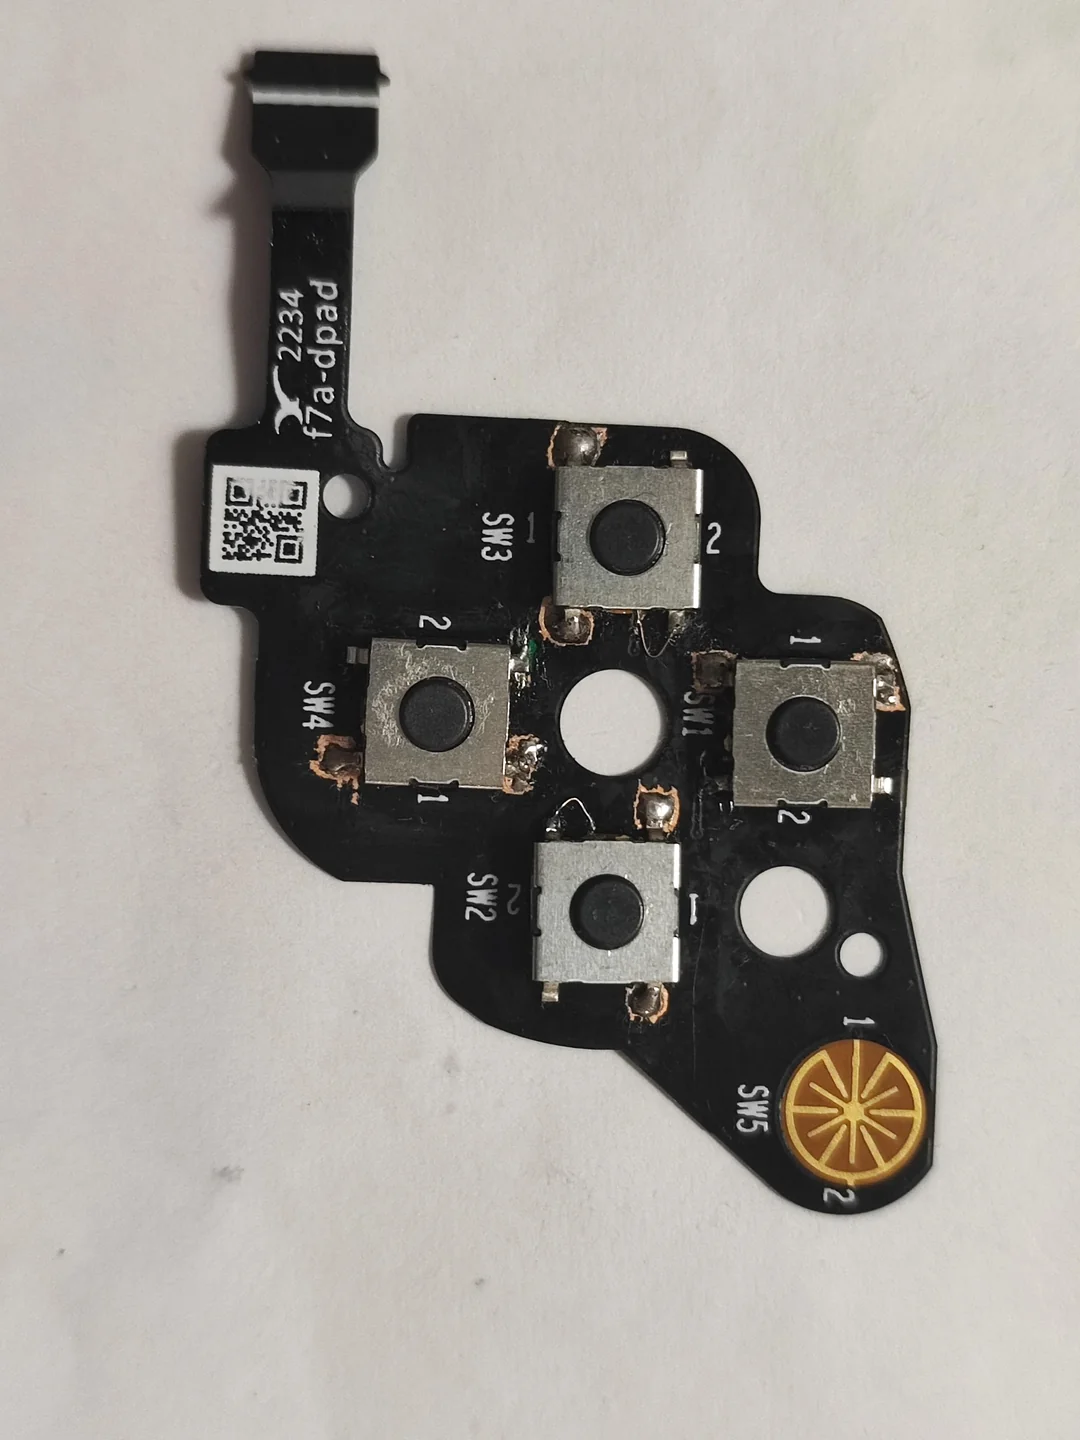
- DIY Method With Mouse Buttons (Cheaper too!)
- Video of how it sounds
- Instructions:
- Get mouse switches (eg. Omron, Kailh)
- Take off flex board
- Scrape off coating
- Solder on the switches
- Maybe put something (eg. copper sheet) behind the board for better heat transfer
- Shave off edges on the buttons and brackets around the buttons on the shell
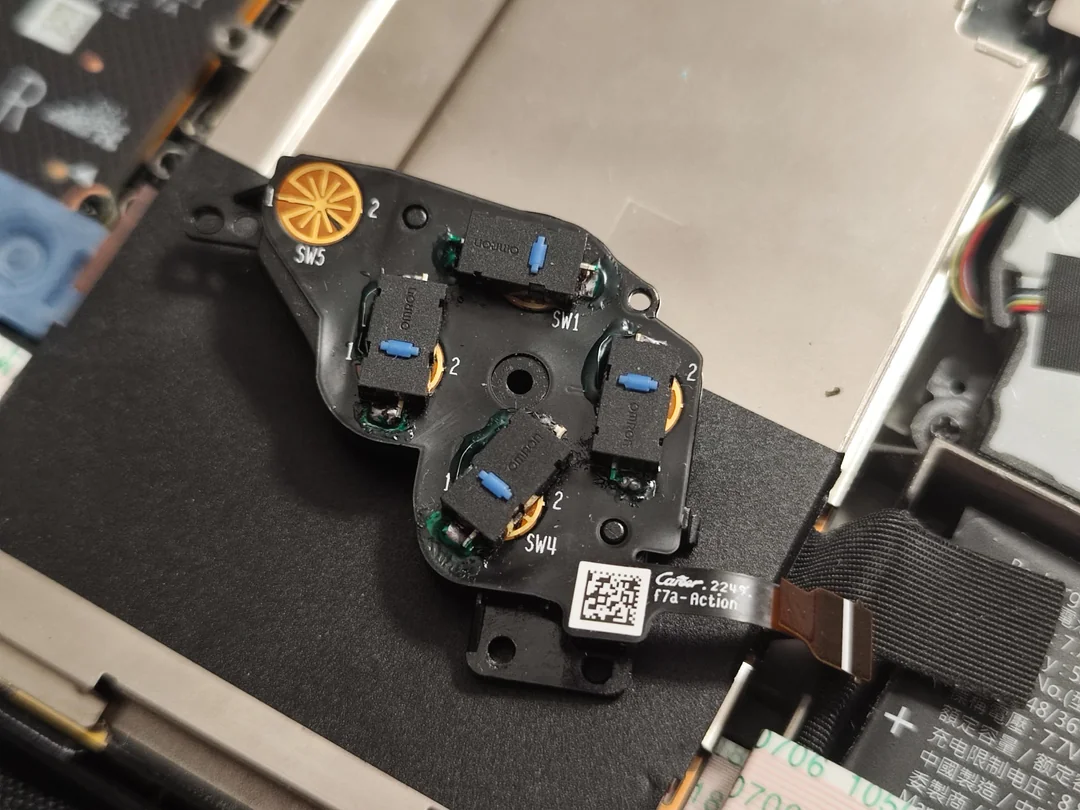
- Another Attempt with Omron B3FS-1000P Buttons

Back Button Extensions
Trigger And Shoulder Button Extensions
Custom Power Button
- Work in progress
Triggers
- Make sure to calibrate after modification - iFixit Steam Deck Trigger Calibration Guide
Dual Stage Triggers
- 3D printed parts + tactile switches
- This model is only known to work with LCD Decks
- Similar Feeling To Steam Controller (“click” feedback on full press)
- Shouldn’t interfere with trigger input values
- Testing video (W.I.P - Uses modified model)